Navigating the world of rental properties can sometimes feel like a complex dance, whether you’re a seasoned landlord or a new tenant. One of the most critical steps in this journey, often overlooked or rushed, is the property inspection. A thorough inspection isn’t just a formality; it’s a vital safeguard that protects the interests of everyone involved, helping to prevent disputes, clarify responsibilities, and ensure the property remains in excellent condition over time.
Imagine having a clear, organized system that guides you through every nook and cranny of a rental unit, documenting its condition from top to bottom. That’s precisely where a robust checklist comes into play. It transforms a potentially overwhelming task into a manageable and systematic process, ensuring nothing important is missed. And the best part? You don’t always need to start from scratch. A well-designed free rental inspection checklist template can be your secret weapon, providing a solid foundation for consistent and comprehensive evaluations.
Why Every Rental Property Needs a Thorough Inspection Process
A meticulous inspection process forms the backbone of successful property management and harmonious tenant-landlord relationships. For landlords, it’s about more than just identifying damage; it’s about preserving your investment, tracking maintenance needs, and ensuring compliance with lease agreements. It provides tangible evidence of the property’s condition at various stages, which is invaluable if disagreements arise, especially concerning security deposit deductions.
From a tenant’s perspective, participating in and signing off on a detailed inspection protects your security deposit from claims for pre-existing damage. It establishes a clear baseline of the property’s condition when you move in, empowering you to leave the property in the same state, minus normal wear and tear, without fear of unfair charges. It also gives you an opportunity to document any issues you notice early on, ensuring they are addressed promptly by the landlord.
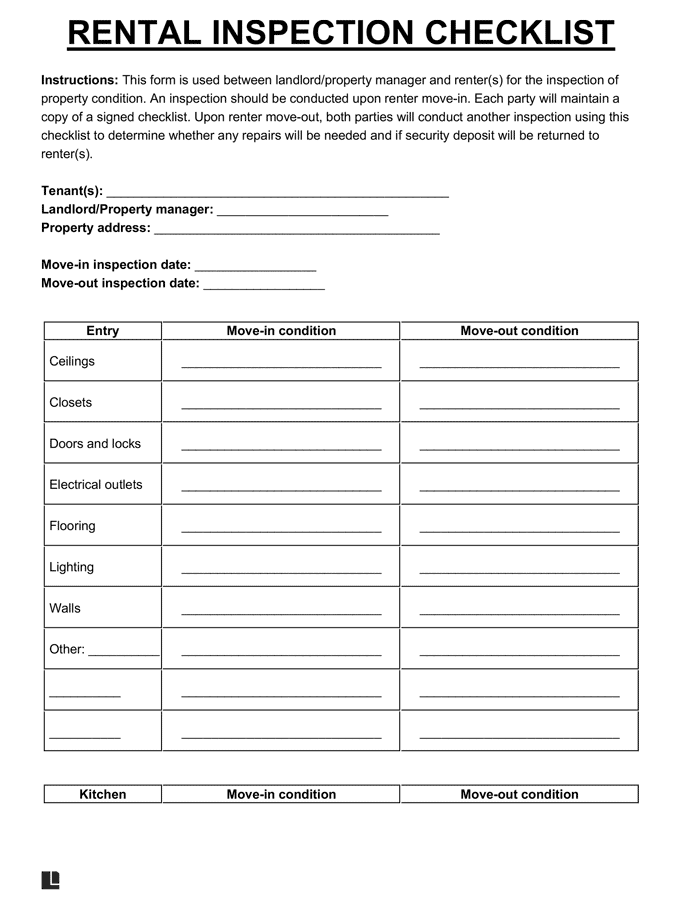
There are typically three key inspection points during a tenancy: the move-in inspection, routine inspections, and the move-out inspection. Each serves a distinct purpose. The move-in inspection sets the initial benchmark. Routine inspections, usually conducted periodically during the lease term, help identify maintenance issues before they become major problems and ensure the tenant is upholding their part of the agreement regarding property upkeep. Finally, the move-out inspection compares the property’s condition against the move-in report to assess any changes or damages.
Ultimately, a structured inspection process fosters transparency and accountability. It encourages open communication between landlords and tenants about the property’s condition and expectations. By proactively documenting everything, both parties can avoid miscommunications and costly legal battles, leading to a much smoother rental experience for everyone involved.
To ensure this process is consistent and truly effective, using a standardized tool is essential. This is where a free rental inspection checklist template becomes indispensable. It provides a consistent framework, guiding you through every critical area of the property, ensuring that no detail, no matter how small, is overlooked.
Key Areas to Cover During Any Inspection
- Exterior: Check roof condition, gutters, siding, foundation, landscaping, fences, and gates. Note any damage to paint, visible cracks, or blockages.
- Living Areas & Bedrooms: Inspect walls for holes, cracks, or excessive scuffs. Check ceilings for water stains or damage. Evaluate flooring (carpets, hardwood, tiles) for cleanliness, stains, or damage. Test all lights, switches, and outlets. Look at windows and doors for proper function, seals, and lock security.
- Kitchen: Examine appliances (refrigerator, oven, dishwasher, microwave) for cleanliness and functionality. Check countertops, cabinets, and drawers for damage. Inspect sink, faucet, and garbage disposal.
- Bathrooms: Look for cleanliness and functionality of toilet, sink, and shower/tub. Check for leaks, mold, or mildew. Inspect tiles, grout, and ventilation.
- Utility & Mechanical: Verify heating and air conditioning units are working. Check water heater for leaks. Inspect smoke detectors and carbon monoxide detectors.
- Safety: Ensure all locks are secure and functioning. Check for fire extinguishers if provided.
Making the Most of Your Rental Inspection Checklist Template
Having a free rental inspection checklist template is a fantastic start, but its true value comes from how effectively you use it. Preparation is key: print multiple copies, bring a camera or smartphone for photos and videos, and ensure you have a pen or tablet for notes. Before the inspection, take a moment to familiarize yourself with the template, understanding each section so you can navigate the property systematically. Clear communication with the tenant (or landlord) is also crucial; explain the purpose of the inspection and encourage them to point out anything they notice.
Remember that a generic checklist is a starting point. While a free rental inspection checklist template covers common areas, every property has unique features. Don’t hesitate to customize your template. Add specific items relevant to your property, such as a built-in sound system, specific smart home devices, or unique landscaping features. This personalization ensures the checklist accurately reflects the property you’re inspecting and minimizes the chances of missing something important.
Beyond simply ticking boxes, detailed documentation is your best friend. For every item on your checklist, make concise, descriptive notes. “Stain on carpet” is good, but “Small, faded red stain (approx. 2 inches) on living room carpet near north wall” is much better. Always back up your written notes with visual evidence. Take clear, well-lit photographs and even short videos of every room and any noted damage. Date-stamp your photos whenever possible, as this provides irrefutable evidence of the property’s condition at a specific time.
The inspection isn’t complete until both parties have reviewed and signed the document. After going through the property, sit down with the tenant (for move-in/out inspections) or property manager to review the completed checklist and accompanying photos. This ensures everyone is on the same page and agrees on the documented condition. Any discrepancies should be discussed and resolved on the spot, with both parties initialing any changes made to the document. Provide a copy to the tenant for their records, fostering trust and transparency.
Adopting a structured approach to rental property inspections, supported by a comprehensive checklist, is more than just a good practice; it’s a fundamental aspect of sound property management and positive tenant relations. It lays a clear foundation of expectations, minimizes potential disagreements, and ultimately helps preserve the value and comfort of the rental home for everyone involved. The effort invested upfront in a thorough inspection process truly pays dividends over the entire tenancy, ensuring a smoother journey from move-in to move-out.
By empowering yourself with the right tools and a systematic approach, you create an environment of clarity and fairness. This not only protects your investment or your security deposit but also builds a relationship based on mutual understanding and respect. Utilizing a dependable free rental inspection checklist template is a smart, proactive step towards achieving this, making the complex task of property oversight clear, consistent, and remarkably straightforward.


