You’ve made it to the home stretch! The keys are almost in your hand, and the dream of your new home is just around the corner. But before you uncork the champagne and start planning your furniture layout, there’s one incredibly important step remaining: the final walk-through. This isn’t just a casual stroll through the property; it’s your last critical opportunity to ensure everything is exactly as it should be before signing on the dotted line.
Think of it as your final quality check. While it might feel like an exciting formality, skipping this vital step or approaching it without a clear plan can lead to unwelcome surprises later on. That’s why having a structured approach is so crucial. A well-prepared final walk through checklist template can transform this potentially overwhelming process into a smooth, organized, and reassuring experience, ensuring your peace of mind as you embark on your new homeownership journey.
Why the Final Walk-Through Isn’t Just a Formality
The final walk-through might seem like a mere formality, but it’s far more significant than that. It’s your last line of defense against unexpected issues. Imagine arriving at your new home on moving day only to find a broken window, a leaky faucet, or a missing appliance that was supposed to be included. These are the kinds of headaches the final walk-through is designed to prevent. It’s your opportunity to verify that the property is in the condition you expect, based on your purchase agreement and any repair addendums.
This crucial step typically occurs 24 to 48 hours before closing. The timing is deliberate; it’s close enough to closing that no new significant issues should arise, but still allows a small window of time to address any last-minute discrepancies. During this visit, you’re not just admiring your soon-to-be home; you’re meticulously inspecting it. You’re checking that any agreed-upon repairs have been completed to your satisfaction and that no new damage has occurred since your last visit.
It’s also the moment to confirm that all fixtures, appliances, and other items stipulated in your contract are still present and in working order. Sometimes, sellers might accidentally or intentionally remove items that were supposed to convey with the property. This is your chance to catch such omissions. Being thorough now can save you a lot of stress, negotiation, and potential costs down the road.
Bringing your real estate agent to the final walk-through is highly recommended. They are familiar with the purchase agreement and can help mediate any issues that might arise. Their expertise can be invaluable in identifying potential problems you might overlook and in understanding the correct protocol for addressing them with the seller. This collaborative approach ensures that your interests are protected throughout the process.
Approaching this inspection systematically is key. Rather than just wandering through, you need a methodical plan to cover every corner of the property. This is precisely where a well-structured final walk through checklist template becomes your best friend. It acts as your guide, ensuring that no detail, no matter how small, is overlooked in the excitement of impending homeownership. It’s about being proactive and ensuring your investment is sound.
Key Areas to Scrutinize
- Exterior: Check for any new damage to the roof, siding, windows, and foundation. Ensure the landscaping is in acceptable condition and that garage doors open and close properly.
- Interior Walls and Ceilings: Look for fresh cracks, water stains, or poorly patched areas. Verify paint matches if touch-ups were done.
- Floors: Inspect carpets for new stains, hardwood for scratches, and tiles for chips or cracks.
- Kitchen: Test all appliances included in the sale (oven, dishwasher, microwave, refrigerator). Check cabinets, counters, and the sink for damage and proper function.
- Bathrooms: Run water in sinks, showers, and tubs. Flush toilets. Check for leaks around fixtures and under cabinets. Ensure proper drainage.
- Bedrooms: Confirm all closet doors slide smoothly and windows open, close, and lock.
- Utilities: Test all light switches, ceiling fans, and electrical outlets. Turn on the HVAC system (both heating and cooling) to confirm it’s operational. Check the water heater.
- Agreed-Upon Repairs: Verify that all repairs stipulated in your contract have been completed professionally and satisfactorily.
- Included Items: Double-check that all fixtures, window treatments, and other items listed in the purchase agreement are present and accounted for.
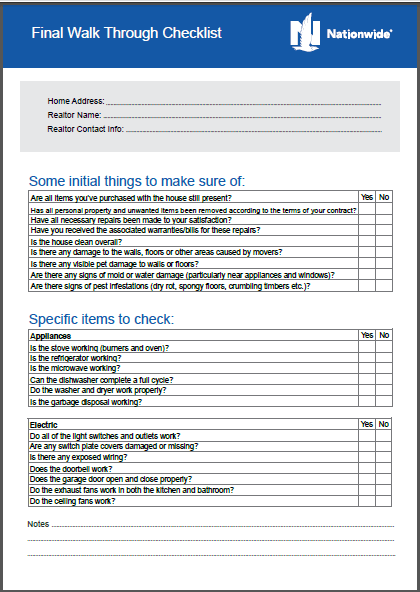
Your Go-To Final Walk-Through Checklist
Now that we understand the immense importance of this final inspection, let’s dive into the practicalities. To truly maximize the effectiveness of your walk-through, you’ll want to come prepared with more than just good intentions. A methodical approach, guided by a comprehensive checklist, will be your most valuable asset. Think of it as a treasure map, guiding you to every nook and cranny that needs your attention before you take possession.
Before you even step foot in the door, gather your essential tools. Bring a copy of your purchase agreement and any repair addendums—these documents are your reference points for what should be present and what repairs should be done. Don’t forget your phone or a camera to document any issues you find with clear, timestamped photos or videos. A small flashlight can be useful for looking into dark corners, and a phone charger is perfect for testing all electrical outlets.
As you move through the house, treat each room as its own mini-project. Go systematically, perhaps from left to right, covering every surface and testing every function. This prevents you from getting sidetracked or missing things. Open and close all doors and windows, making sure they latch securely and operate smoothly. Don’t just visually inspect; interact with the home. This active engagement is critical to uncovering potential issues.
Should you discover any problems—whether it’s an uncompleted repair, new damage, or a missing item—document it immediately. Take clear pictures, note the specific location and nature of the issue, and inform your real estate agent right away. They will then communicate with the seller’s agent to determine the best course of action before closing. Remember, this is your final opportunity to address these concerns, so speak up if something isn’t right.
- Confirm all agreed-upon repairs are complete and done professionally.
- Check all light fixtures and switches throughout the home.
- Run water in all sinks, showers, and bathtubs, looking for leaks and verifying hot water.
- Flush toilets to ensure they operate correctly and don’t leak.
- Test all major appliances included in the sale (stove, dishwasher, microwave, refrigerator, washer, dryer).
- Verify the heating and air conditioning systems are fully operational in all rooms.
- Open and close all windows and doors, checking locks and screens.
- Inspect all walls, ceilings, and floors for any new damage since your last visit.
- Test electrical outlets using a phone charger or small appliance.
- Check the garage door opener and ensure all remotes are present.
- Look for any signs of pests or unwanted critters.
- Confirm all personal property listed as conveying with the home is present.
Taking the time for a thorough final walk-through, armed with a clear plan, empowers you to make an informed decision at the closing table. It’s your last chance to protect your investment and ensure that the home you’re about to own truly meets your expectations and the terms of your agreement. This careful attention to detail provides immense peace of mind, allowing you to move forward confidently into your new chapter.
This diligent final check isn’t just about spotting problems; it’s about confirming that your future home is ready for you to enjoy from day one. By taking these methodical steps, you’re setting yourself up for a smooth transition and a truly happy beginning in your new space, free from avoidable surprises. It’s the ultimate act of preparation, ensuring that your dream home is exactly as you envisioned.


