Bringing a new building project to completion is an incredibly rewarding experience, but before anyone can move in or open their doors, there’s one crucial final step: making the space sparkle. This isn’t just about a quick sweep; it’s a meticulous process that transforms a construction site into a pristine, ready-to-use environment. To ensure every speck of dust is tackled and every surface shines, having a comprehensive new construction cleaning checklist template is not just helpful, it’s essential for efficiency and a flawless finish.
Imagine the chaos of a construction site: sawdust clinging to every surface, paint splatters, discarded materials, and a general layer of grime. Attempting to clean such a space without a clear plan can lead to missed spots, wasted time, and ultimately, a less-than-satisfactory result. A well-structured checklist provides a roadmap, guiding cleaning teams through each phase and area, guaranteeing that no detail is overlooked, no matter how small.
This article will guide you through the intricacies of post-construction cleaning, offering insights into creating and utilizing an effective checklist. From the initial rough clean to the final polishing touches, we’ll explore what it takes to deliver a truly immaculate finish, ensuring that your newly constructed space is not just built right, but also presented perfectly.
Navigating the Stages of a Pristine Post-Construction Clean
The journey from a dusty construction zone to a gleaming, move-in-ready space is typically broken down into several distinct phases. Each phase builds upon the last, systematically removing different types of debris and refining the cleanliness of the area. Understanding these stages is fundamental to developing an effective new construction cleaning checklist template. It’s not just about cleaning; it’s about a strategic approach that maximizes efficiency and ensures a high-quality outcome.
The first stage is often referred to as the “rough clean.” This happens while construction is still somewhat ongoing or immediately after the major work is finished but before final fixtures and finishes are fully installed. The primary goal here is to remove large debris, trash, and protective coverings. Think of it as a significant decluttering and initial sweep. Carpenters, electricians, and plumbers might still be on site, so safety is paramount. Tasks include sweeping and vacuuming floors to remove sawdust, plaster, and small debris, collecting and disposing of packaging materials, and wiping down large surfaces to remove obvious dust layers.
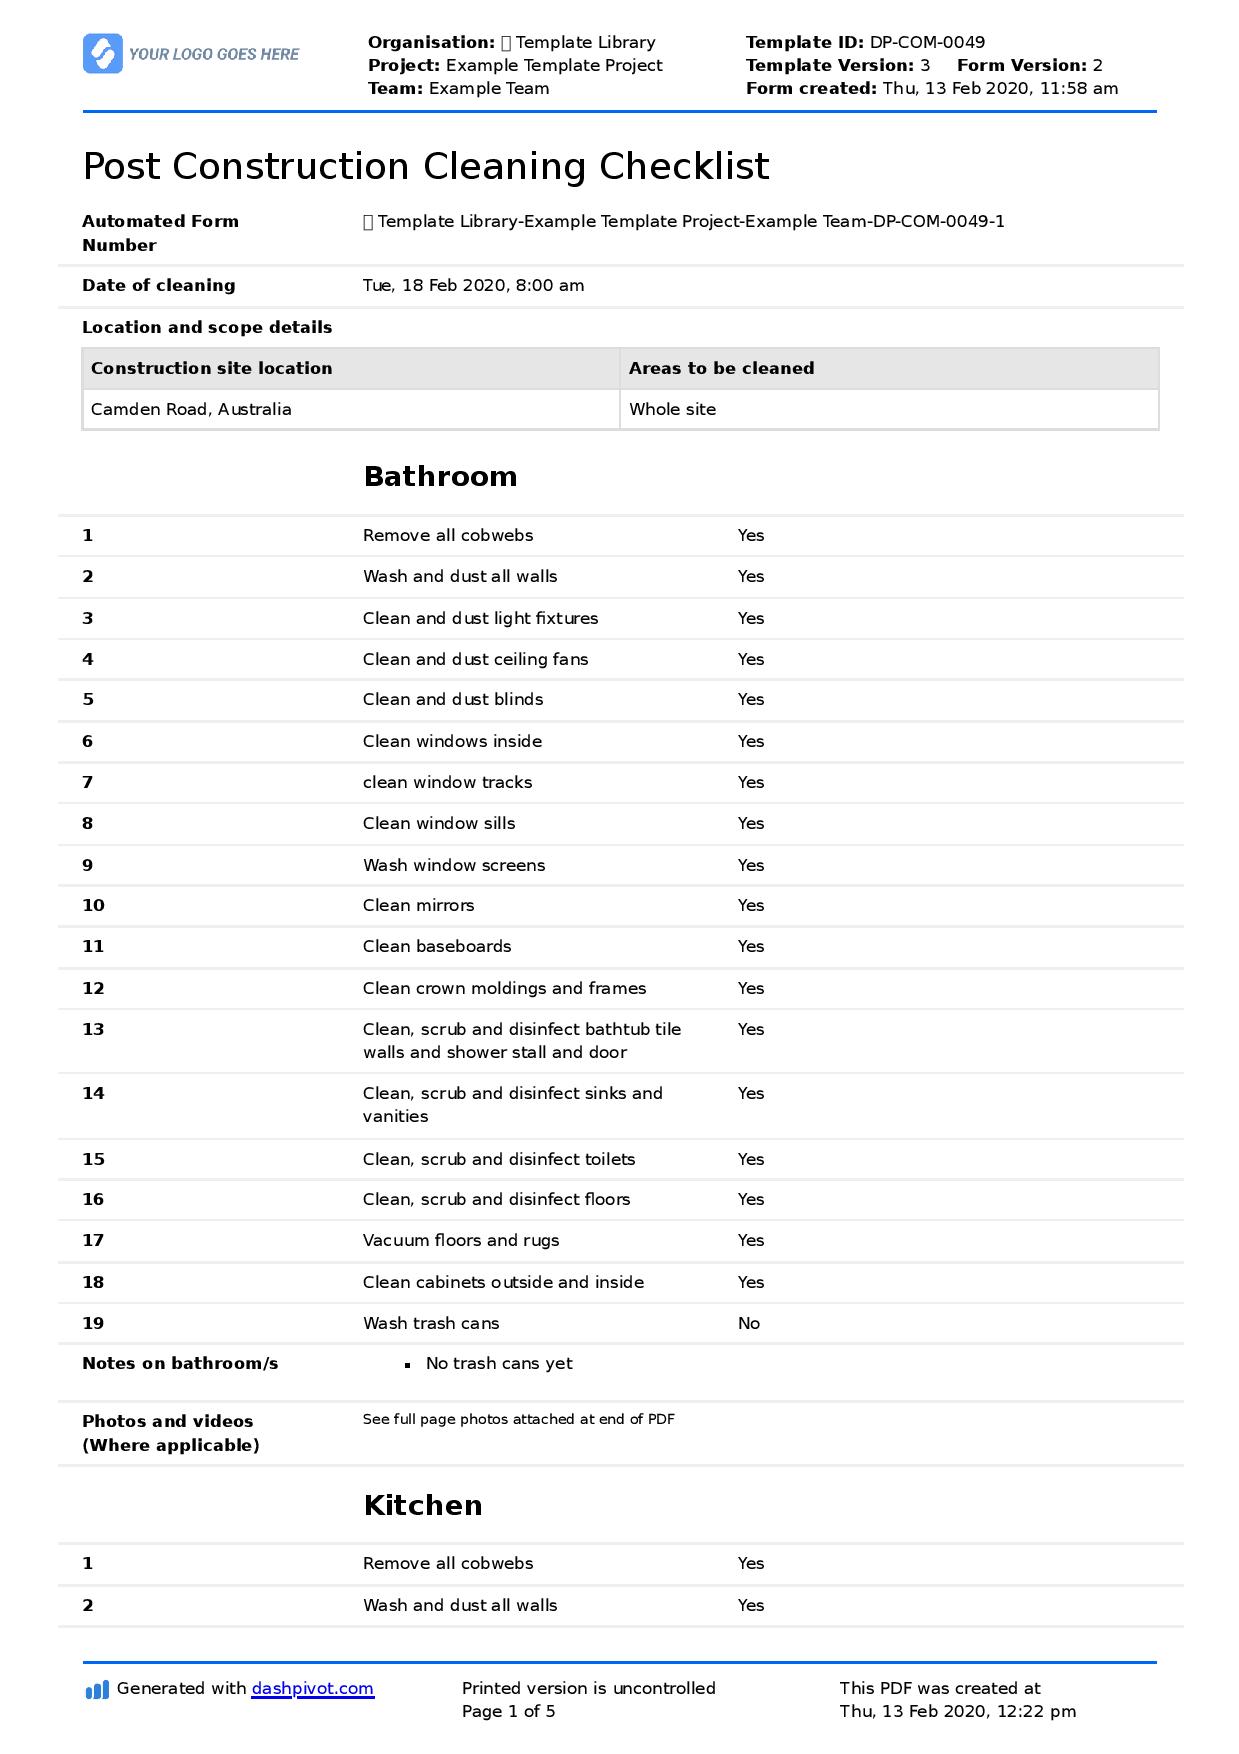
Following the rough clean, we move into the “final clean” or “detail clean” phase. This is where the magic truly happens, transforming the space from merely tidied to impeccably clean. This stage begins once all construction work is entirely completed, and workers have left the site for good. Every surface needs attention, from high ceilings to baseboards. Windows must be cleaned inside and out, removing stickers, paint, and dust. Light fixtures, vents, and ceiling fans require meticulous dusting and wiping. All surfaces, including countertops, cabinets, and appliances, must be thoroughly cleaned and polished.
Flooring also demands specific care during the final clean. Depending on the material, whether it’s hardwood, tile, carpet, or concrete, each requires a tailored approach. Hardwood floors need careful cleaning and polishing, while tile and grout often require scrubbing to remove haze and dirt. Carpets should be thoroughly vacuumed, and spot treatments applied as needed. Even the small details like cleaning door frames, hinges, and outlet covers contribute significantly to the overall impression of a truly clean space.
Finally, there’s often a “touch-up clean” or “punch list clean” just before client handover or occupancy. This quick once-over addresses any lingering dust that might have settled, smudges from final inspections, or minor adjustments. It’s a crucial step for presentation, ensuring the space is absolutely perfect on viewing day. This could involve another light vacuum, wiping down high-touch surfaces, and a final check of windows and mirrors for streak-free clarity.
Throughout all these stages, safety protocols are non-negotiable. Ensuring proper ventilation, using appropriate personal protective equipment (PPE), and handling cleaning chemicals safely are paramount. A comprehensive checklist won’t just list cleaning tasks; it will also incorporate safety reminders and quality control checks to ensure a safe working environment and a high-standard finish.
Tailoring Your Template for Diverse Projects
While a general new construction cleaning checklist template provides an excellent starting point, true efficiency and client satisfaction come from the ability to adapt and customize. Every construction project is unique, varying in size, scope, materials used, and client expectations. A small residential renovation will have different cleaning needs than a multi-story commercial building, and acknowledging these differences is key to delivering a personalized, professional service.
Consider the specific features of the space. A kitchen, for instance, will require detailed cleaning of inside and outside cabinets, drawers, sinks, faucets, and appliance exteriors. Bathrooms demand extra attention to fixtures, tiling, grout, and mirrors. Commercial spaces might have large open areas, specific flooring types like polished concrete, or specialized equipment that needs careful handling. Your checklist should be flexible enough to allow for the addition or removal of tasks based on these particularities.
Furthermore, client expectations play a significant role. Some clients might require eco-friendly cleaning products, while others might have specific preferences for certain finishes or a particular level of polish. Discussing these details upfront allows you to integrate them into your customized checklist, ensuring that the final result aligns perfectly with their vision. This collaborative approach not only streamlines the cleaning process but also strengthens client relationships, leading to repeat business and positive referrals.
Here are some key areas to consider including in your customized checklist:
- Removing all stickers and labels from windows, fixtures, and appliances.
- Dusting and wiping all high surfaces, including ceiling fans, light fixtures, and vents.
- Cleaning all glass surfaces, mirrors, and windows to be streak-free.
- Wiping down all walls, baseboards, and door frames to remove dust and smudges.
- Cleaning inside and outside of all cabinetry, drawers, and shelving.
- Sanitizing all sinks, toilets, showers, and bathtubs.
- Vacuuming carpets thoroughly and treating any visible spots.
- Sweeping, mopping, and polishing all hard-surface floors.
- Cleaning all outlets, light switches, and door hardware.
- Emptying all trash receptacles and replacing liners.
By thoughtfully adapting your checklist for each new project, you not only ensure comprehensive cleaning but also demonstrate a commitment to detail and client satisfaction. This strategic approach elevates the entire post-construction cleaning process, making it more manageable and consistently delivering exceptional results every time.
Ultimately, a spotless finish is the final touch that makes a new construction truly ready for its occupants. By diligently following a well-structured and adaptable checklist, cleaning teams can consistently achieve this high standard, ensuring that every newly built or renovated space presents itself in its best possible light. It’s about more than just cleaning; it’s about perfecting the transition from construction zone to a beautifully clean and welcoming environment.


