Utilizing such a tool offers several advantages. It streamlines the design application process, saving time and resources by minimizing misalignments and the need for reprints. Consistent placement enhances the professional appearance of finished products, building brand credibility and customer satisfaction. Moreover, these tools often facilitate symmetrical designs and aid in visualizing the final product before application, improving design accuracy and overall aesthetic appeal.
This foundational understanding of the tool’s purpose and advantages paves the way for a deeper exploration of its practical application, variations, and optimal usage within different design and production workflows.
Key Components of a T-Shirt Alignment Tool
Several key components contribute to the effectiveness of a t-shirt alignment tool. Understanding these elements allows for optimal utilization and accurate design placement.
1: Material: Typically constructed from transparent, flexible materials like clear acrylic or durable plastic, enabling clear visibility of the garment and design beneath. Flexibility allows conformation to various garment shapes and sizes.
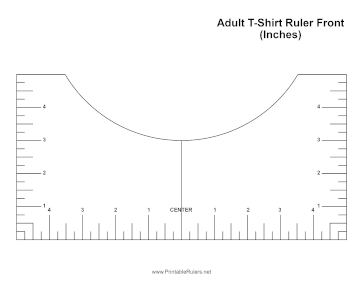
2: Markings and Measurements: Clearly defined markings indicate common placement areas such as center chest, back, sleeve positions, and neckline. Rulers and gridlines provide precise measurements for consistent sizing and alignment.
3: Size Guides: Often incorporates size guides for different garment sizes (e.g., S, M, L, XL), ensuring appropriate design scaling and placement based on the specific garment dimensions.
4: Alignment Points and Crosshairs: Specific points or crosshairs assist in aligning design elements accurately, particularly helpful for multi-layered designs or intricate patterns.
5: Neckline and Shoulder Guides: Dedicated markings for neckline and shoulder seams provide reference points for precise placement in these crucial areas.
6: Sleeve Guides: Markings for sleeve placement ensure consistent positioning of designs on sleeves, including specific points for bicep or forearm placement.
These elements work in concert to provide a comprehensive framework for precise and repeatable design placement on apparel, ensuring consistent, professional results.
How to Create a T-Shirt Alignment Tool
Creating a custom alignment tool allows for precise design placement tailored to specific needs. The following steps outline the process.
1: Material Selection: Choose a durable, transparent material like clear acrylic or thick, clear plastic sheeting. The material should be flexible enough to conform to garment shapes but rigid enough to maintain its form.
2: Measurement and Marking: Using a ruler and a permanent marker, create markings for common placement areas: center chest, back center, sleeve positions (top, middle, cuff), and neckline. Include horizontal and vertical rulers with clear, accurate measurements.
3: Size Guides: Incorporate garment size guides. Measure typical t-shirt sizes (S, M, L, XL, etc.) and mark these dimensions on the template. Consider including width and length measurements.
4: Alignment Points: Add crosshairs or alignment points at key locations to aid in centering designs and ensuring symmetry.
5: Neckline and Shoulder Guides: Mark the typical positions of necklines and shoulder seams. This provides consistent reference points for designs near these areas.
6: Sleeve Guides: Create markings specifically for sleeve placement, noting common positions for graphics on the bicep, forearm, or wrist.
7: Refinement and Testing: Test the template on various garment sizes and styles. Refine markings and measurements based on testing results for optimal accuracy and usability.
A precisely crafted tool facilitates consistent design placement, reduces errors, and streamlines the apparel decoration process. Regular review and potential adjustments based on evolving design needs ensure continued effectiveness and optimal workflow integration.
Accurate and consistent design placement is paramount in professional apparel decoration. A t-shirt ruler guide template provides a crucial tool for achieving this precision. From material selection and marking key measurements to incorporating size guides and alignment points, understanding the components and creation process of such a template empowers effective utilization. Its benefits extend beyond mere alignment, encompassing streamlined workflows, reduced errors, and ultimately, enhanced product quality and brand consistency.
The proper utilization of these tools signifies a commitment to professionalism and quality within the apparel design and production process. As design trends and production techniques evolve, the strategic adaptation and refinement of these tools will remain essential for maintaining efficiency and delivering high-quality, visually appealing apparel.

